
Can polish be automated?
Writing an agent skill to allow long-running agents to iteratively improve their outputs
Introduction
Coding agents are deeply rooted in an iterative workflow: a builder prompts the agent, sees the output rendered, provides feedback, and the cycle continues until some acceptance criterion is met. For matters of taste, it is our strong belief that the developer’s viewpoint gets encoded through this iteration process and thus we should not try to automate it.
This post focuses on the practical issue of iteration loops where the desired state is known ahead of time, and the builder’s time might be better spent elsewhere. A good task for a computer.
To this end, we stumbled on a pattern unique to agent harnesses with all of:
- Vision understanding and screenshot ability
- Computer-use ability
- Sub-agent support
which is true of most leading-edge systems today. We tested it with Pi.
In a previous post, we wrote about how coding agents have passed a threshold where, given complete requirements, they can generally one-shot a good result. This collapses a huge class of problems and leaves a more interesting class of new ones. For instance, a senior engineer might know to specify that a filterable React table should be memoized, but the average person does not.
As more people take part in software creation, how can we empower them to punch up, getting expert performance out of the tools they didn’t know to ask for? This is the goal of this post.
Initial Prompt
The idea is quite simple:
- the coding agent (e.g. Claude Code) writes code to implement a feature,
- we commission a separate coding agent to critique the output, and then
- the original model responds to the feedback
and so on. Think: the smallest-possible inner loop of self-healing codebases. We’ll share the prompt we used and walk through three examples, in order of increasing difficulty, to illustrate how it works.
Before we begin, your intuition might be: if quality can be squeezed out of these models by simply getting them to critique themselves, wouldn’t the AI labs have RL’d every drop into their one-shot performance? In theory, yes, but these models are optimized for multiple rewards, some of which might be time-to-accepted-solution or lines-of-code-changed (the fewer, the better). Such a compromising regime naturally leads to solutions that balance multiple factors. Claude Code is less like a tenured professor and more like a bazaar stall-keeper.
In the same way that getting 2022 models to think before speaking yielded radically better math scores, we can push coding agents to iterate before presenting and expect better results.
Example 1: SaaS Landing Page
As a start, we (actually, Claude Code, in a very meta way) wrote this SKILL.md to test the thesis, starting with the challenge of building a distinct landing page for a fictional SaaS:
---
name: iterate-ui
description: Build a UI, screenshot it, critique the screenshot, and improve it.
---

# Iterate on UI

1. Build the feature.
2. Run the dev server and take a screenshot.
3. Look at the screenshot and list what looks bad.
4. Fix the worst issues.
5. Repeat until it looks good.You’ll notice the prompt is very UI-specific, which is more an artifact of our upstream prompt than anything else, but it serves well as a high-water mark to gauge how well our prompt generalizes in the coming examples.
And here is the result of three rounds of iteration on the top-level prompt “build a mobile landing page for Cadence, a habit tracker for teams”:

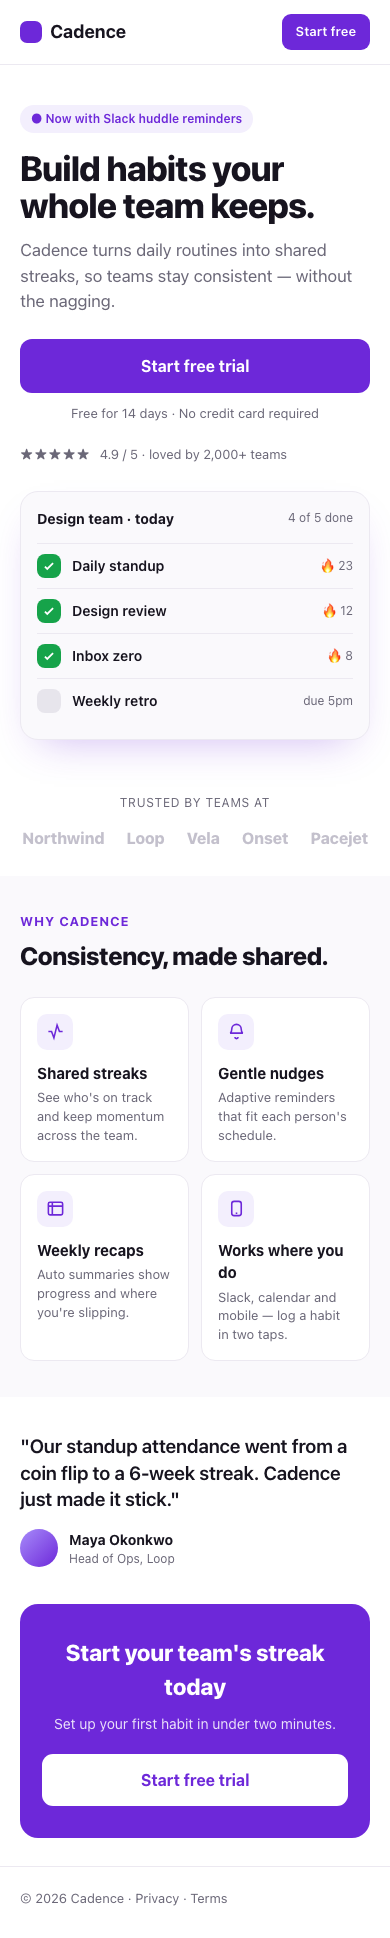

The one-shot result is likely familiar to you as an all-too-common design language in 2026, characteristic of vibecoding. The third iteration is better (if not intriguing): clear visual hierarchy, good colour contrast, and better narrative arc.
See the live results here.
In the next example, we explore a more quantifiable pursuit: performance optimization.
Example 2: React Component Performance
In this example, we ask the coding agent to build a simple table with search, sorting, and column-summing. We render it with 10 000 (fictional) transactions and measure how long it takes to load, and then we automatically enter a search query and measure how long it takes to filter results.
The naive solution (with data recomputed on every keystroke) is extremely slow. At your own risk, you can try it out here.
Before iterating, the agent is instructed to lock off behaviour by writing a suite of unit tests. Tests must continue to pass for an iteration to be accepted.
# Iterate on performance

1. Define the metric (e.g. p50 filter latency in ms) and write a benchmark that prints it.
2. Write/keep a test suite that pins correct behavior. It must pass before and after every change.
3. Each pass: form one hypothesis, change one thing, re-run tests + benchmark.
   Keep the change only if tests pass AND the metric improved. Otherwise revert.
4. Stop when you hit the target or gains flatten. Log before/after numbers each pass.After two iterations, the model thinks to memoize computed data, debounce the search input, and virtualize the table (render only visible rows plus a small buffer). Here, the improvement is drastic.
In a third and final example, we seek to merge the previous two via a wider-reaching task: building a product walkthrough.
Example 3: Product Onboarding Flow
To improve an onboarding flow requires all of
- a working model of the product being shown,
- clicking through the flow, taking screenshots or screen recordings, and
- comparing the flow against the product.
This is obviously quite complex and open-ended so we did not expect the agent to do well. Results were surprising.
The onboarding flow gains a progress indicator, inline validation, sensible defaults, and skippable steps as the agent removes the friction it kept hitting.
You can test the onboarding flows here.
Putting it all together
Below is a combined skill which attempts to capture the best of each of the above exercises.
---
name: iterate
description: Improve your own work across iterations. After building anything, define how to judge it, measure the current state, fix the highest-impact problem, and re-measure — until it meets the bar or gains flatten.
when_to_use: After producing any artifact (a UI, a component, an API, a flow) where the first attempt is unlikely to be the best one.
---

# Iterate

The first version is a draft. Your job is the loop that follows.

## 1. Define the bar
Before improving anything, write down how this artifact will be judged:
- **Visual** → a 1–5 rubric (hierarchy, contrast, type scale, spacing, CTA clarity,
  trust signals, "does it look generic?"). Always screenshot at a fixed viewport.
- **Performance** → one measurable metric (e.g. p50 latency in ms) plus a benchmark
  that prints it, and a test suite that pins correct behavior.
- **Flow / interactive** → a concrete task to complete; success = the artifact can be
  used end-to-end without confusion. Drive it with browser/computer use, not a glance.

## 2. Measure the current state
Run it and capture evidence (screenshot, benchmark number, walkthrough recording).
Write down the top problems, ranked by impact.

## 3. Change one thing
Fix only the highest-impact problem this pass. Don't refactor opportunistically.

## 4. Re-measure and gate
Re-capture the same evidence at the same settings.
- Keep the change only if it improved the bar AND broke no guardrail (tests stay green).
- Otherwise revert and try the next hypothesis.

## 5. Stop deliberately
Stop when you meet the bar, run out of budget (cap the passes), or gains flatten.
Keep a short changelog: what was wrong, what you changed, before → after.We are confident it can be improved.
If this sparked an idea for your roadmap, let's talk.
Rubric is an applied AI lab helping teams design and ship intelligent products.